Caring for pasture raised chickens … electric netting, chicken tractors and chicken caravans

There are many different ways to house your chickens, but when your aim is to ensure that your birds get access to plenty of fresh pasture daily, there are a few problems that need to be addressed: Predator protection, Portable Housing, Feeding and Watering.

Predator Protection

We are located in the Sydney basin (in Australia). What that means is that we have to contend with a rather large population of feral foxes, wild dogs, bored neighbourhood dogs, a few native hawks and a resident pair of Wedge Tailed eagles. Just a few things 😉

While we have had the occasional loss of a bird to a hawk, we noticed that they only seemed to prey on the smaller birds. So this was easily remedied by ensuring that all our birds are in an enclosed “avery” until they are at least four months old. Plus the hawks are hesitant to attack anything too densely packed together, so keeping the chickens close to each other is important.

Our resident Wedge Tailed eagles are actually more scavengers, preferring a carcass to a live bird. So the loss of a live chicken to these guys was negligible. The Wedge Tailed eagles easily carried off our geese that the fox killed one night … we were at the house deciding where to bury the 3 geese carcasses and an eagle came in and took off with one while we weren’t looking!

That only left us with how to deal with the four legged predators … and found that we had to  make a decision on a portable fencing solution. After copious amounts of research, we decided to try out electric netting fences. We have tried two brands of electric netting fence so far and they each have their pro’s and con’s. Here is what we found…

Thunderbird Electric Poultry net:

Pro’s: Lightweight, has steel post step-in’s that don’t bend or warp,

Con’s: Easily tangled, lean pullet breeds can squeeze through the holes

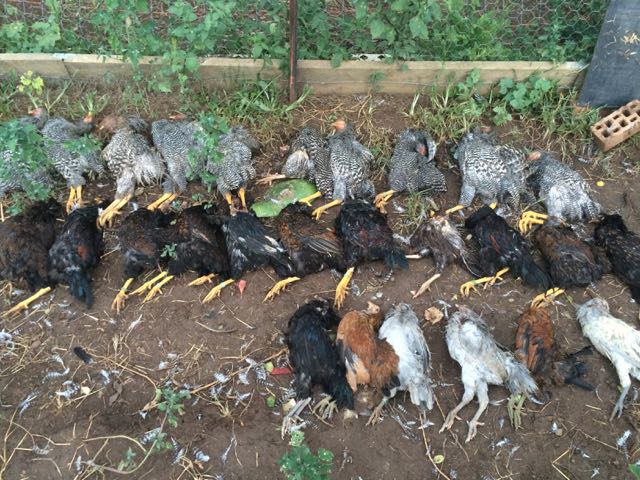
Recommendation: This netting solution has one live wire and an earth, which can conveniently be any of the steel post step-ins. While this is the lightest net, the vertical stays between live wire are not very rigid and cause the net to tangle easily when moved; when moving it at night (which happens usually during Winter) this can be frustrating. The biggest problem we had though was that the smaller pullets could easily squeeze between the holes. Now we’re now talking bantams here, but rather leghorn pullets, which are quite lean birds but not a small bird. Because a birds’ feathers are essentially made of keratin, they are insulated from the effects of the electric pulse. This was a major issue for us, as the birds learned very quickly that there were lots of yummy tidbits in the garden beds nearby. Also, we were alternating the use of the Thunderbird net and the Kencove net in moving our birds. On the night that we were using the Thunderbird net, a fox did manage to get into the enclosure and slaughtered 24 meat birds inside one of the chicken tractors. We’re not sure how it got in either as the fence was operational on all lines. Finally, customer support was non-existant from Thunderbird. When we wrote tot he Thunderbird team … no one even bothered to respond! For these reasons, the Thunderbird Poultry net gets a big “NO” from us.

Kencove Starternet:

Pro’s: Light weight, difficult to tangle, small holes in fence, can be run as either a live wire and earth or a double live

Con’s: has plastic step-in’s which warp easily (but these are about to be replaced free of charge by our supplier with a new solution), more expensive.

Recommendation: Although the cost of the Kencove product was $60 more, it has paid this back by ensuring that the chickens do not have access to our growing beds. There is nothing more frustrating than finding a few chickens happily dust bathing in freshly prepared growing beds or pecking out fresh pea sprouts!  Also, the fact that the stays between the live wires are more rigid ensures that the fence does not tangle as easily as the Thunderbird netting solution. So the Kencove Starternet gets a big “YES” from us.

Portable Housing

Choosing to keep your chickens on pasture makes housing much more difficult than just erecting a shed. One of the main reasons we chose to raise our birds on pasture is that the birds don’t sleep in their own excrement and have fresh clean pasture available to them each day. This reduces the potential for parasities and bacterial infections to affect the flock as their home is clean, fresh pasture and not soiled bedding.

We have tried two methods of portable housing for our chooks. Both have been home made to meet a particular purpose at the time: The Joel Salatin style chicken tractor and a trailer converted to a chicken caravan.

Chicken tractor:

If you have read any of Joel Salatin’s books, you will see that he is willing to share with you all the trial and tribulations of keeping animals according to their natural rhythms. His chicken tractor was excellent. Now while he has stated that foxes don’t like change and won’t dig under a chicken tractor that is moved daily … they must have a different breed of fox in the US because the foxes here don’t give a toss how often it is moved … if it can be dug under then it will be! We lost a few birds on our first trial night …. so added a wire skirt around the tractor. This needed to be pinned each day which proved time consuming. We then teamed up the chicken tractors with an electric fence …. HEAVEN! The perfect solution.

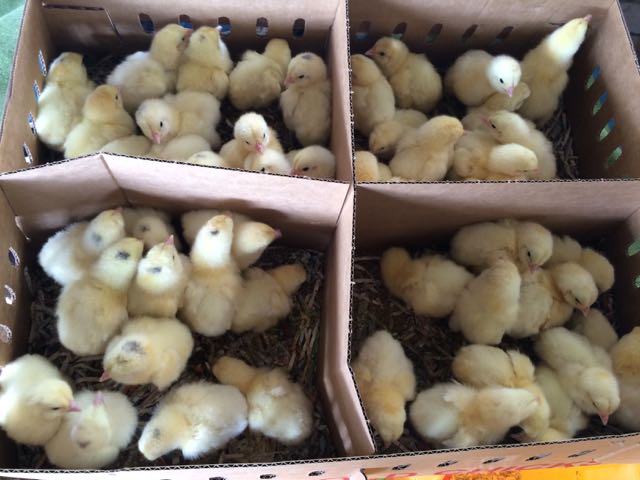
Here are a few of our meat birds and Plymouth Rocks in their tractors.
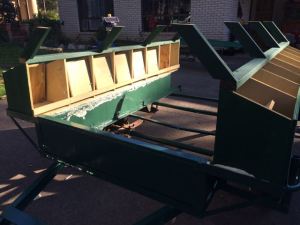
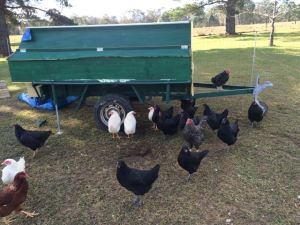
Our Plymouth Rocks teenagers checking out the crazy person who might be bringing tidbits to nibble.
6 week old meat birds on pasture inside their chicken tractor
Chicken caravan:

We increased our laying flock to a little over 100. In doing so, we needed to have a portable solution for lots of chickens which was off the ground in Winter so the birds did not freeze at night … hence the idea of the chicken caravan.

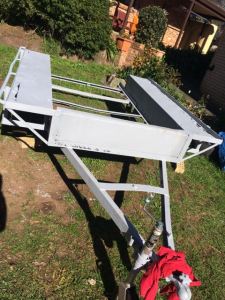
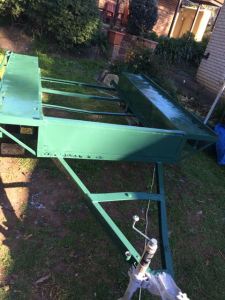
There are multiple solutions out there. Even some amazing commercial ones which have solar powered chicken excluders on the nesting boxes to ensure that the eggs are clean. While these solutions are time saving, we just couldn’t justify spending around $10K for a portable chook house. So we built one instead for a fraction of the cost.

Here are a few images to describe what we did. The downside of the chicken caravan is that you need a vehicle to move it around any great distance. It can be pushed around by hand if you are only moving it a short distance though.

Feeding

Chickens are gluttons! If you left a bag of feed out for them to eat from, they would scatter the entire bag everywhere within minutes, searching for their favourite morsels. Plus, if you are using pelleted feed, this would quickly dissolve easily with assistance from the morning dew.

Chickens need to be rationed in their meals. Always provide enough food for them to be happy, but not too much that it is wasted. For our 100 egg birds, we have found that the perfect amount of feed for them is around 5-6kg of feed per day. The rest they get from the pasture (insects and vegetation).

We use stainless steel treadle feeders in our enclosed pens, but these are cumbersome to keep moving around. We have also used plastic automatic feeders, but these are susceptible to cracking when left out in the sun for extended periods.

For our field birds, we use large plastic trays. We fill four trays (each holds around 1.5 kg) and sprinkle on Diatomaceous Earth as a wormer and Cocchidiosis treatment. These get placed inside the electric fence every morning and they are mostly empty by evening. Yes, they scratch some out on the ground but they clean it up during the night when they get peckish.

Watering

There are so many different solutions out there for watering and we have tried many. For us, we have found that the best solution are two to four 15L stainless steel waterers. We are looking at a barrel system for the upcoming summer months as the chickens need lots more water then.

Ants are highway makers … just on a different scale.

Have you ever stopped to wonder at the different little insects around you. There are just so many with a huge variety of niches that they fill. For us, ants have always been a fascination, none more so than meat eating ants.

We have several different colonies of ants on our property. Meat, nectar and plant eaters alike. Whenever we have a chook die (this happens occasionally), we make an offering to the meat ant nest for a day and then bury the carcass at nightfall. It is amazing how quickly they can strip the meat off a chicken to the bone (or near enough)! Within a couple of hours, most of the visceral area is gone and you end up only needing to dispose of bone and feathers. The perfect little recyclers from our point of view!

But one of the most amazing skills that these little guys have, is their ability to transform their environment at will. A trail of meat ants on the move can easily create a visible path in only 2 days! These little guys, by sheer numbers, tread down a swathe in grass that would put weed killer to shame. For those of you who have never witnessed this, here is a pic of the little guys on the move… at the end of their trail was a wild bird. Pretty impressive!

A trail of meat ants has trodden this path in only 2 days!

Go you little good things!

Raising meat chickens … they’re not a dumb as you might think!

We have started growing pasture raised meat birds. Essentially, they are a commercial breed of meat chicken which we get as day old chicks. They come specially “packaged” and shipped to us within 24 hours of hatching. Here is what they look like in their little shipping box on arrival. A whole box of cuteness if you ask us!

Chicks - day old in box
50 one day old chicks in delivery box

We then introduce them into our brooder. It is a fully enclosed box which rats and other nasties cannot get into. They have a heat lamp, light, plenty of litter  (added to every second day to reduce smells), two feeding stations and two watering stations. There are no draughts and we control the temperature daily, slowing ‘hardening’ them down to be accustomed to lower temperatures. Here is a pic of them in their little brooder…

Chicks - day old in brooder
Day old chicks in brooder box. Protected from predators and draughts with plenty of access to feed and water.

Because these little guys are near our home, they get used to noisy children always handling them and learn quickly that if you approach an extended hand you usually get some nice tidbits. Unlike meat birds raised in sheds that run away from people, these little critters come up to you.

Here is one of our hand fed stars. You can already see good breast development on her. She is very inquisitive and loves being handled … mostly because she knows there is always a treat (or six) involved.

Chicken - 5 week old meat bird
Our children learn how to safely handle chickens. Even the chicken learn that it is OK to be held, just as this 5 week old meat chicken is being done. No running away from these capable little hands.

At the end of their second week, they graduate to our large brooder. It gives them more space to move around with a heated bench at the back under cover and a sunny lounging area at the front where they can eat or just lay down in the sun.

Here are some of our 5 week old chicks (combination of meat birds, plymouth rocks and mixed breed egg layers) snacking on some azolla  which we grow for them.

5 week old chicks snacking on Azolla. They love it!

Once they reach 5 weeks, they are put onto pasture in our Joel Salatin inspired chicken tractors. We have modified the design slightly by adding some skis to the bottom plate to make it easier for us to pull along the ground rather than use a dolly system. It works a treat! Here are the cheeky little ones at 6 weeks of age. They were just moved to fresh pasture. Look at how much more feathered and chunky they are since the last photo. Only 8 days difference in these images!

Chicken - 6 week old meat bird
6 week old meat birds in chicken tractor

There are only 20 birds in this tractor. It is one of our future breeding pens so is smaller than most. We will be stocking these pens with 12 chickens and one very lucky rooster in the next breeding season!

So remember, when you buy your next chook for dinner, have a think about how they were grown and if they were happy. We know ours are. And while it is sad to say farewell to them once they reach eight and a half weeks, we know that they have been fed the BEST diet with a variety of insects, grain and fresh grass. Go you little chooks!

Foxes and the devastation they can cause.

Running a farm, there are always ups and downs and what keeps us going is focusing on the good things that happen; new additions to the farm, fruit harvests, new buildings (you get the idea)! What we cannot stand is waste … senseless waste due to excess.

Sadly, this post is about the only wild animal we have no respect for … the fox. An introduced species, while beautiful to look at and clever to boot, if this little critter behaved more like a hungry animal than a rabid human … the farming world would be a happier place. If you are queasy … please do not read on as there is an image of the outcome at the end.

It is unfortunate for us, that a fox (or more than one for that matter) managed to get into our breeding chicken coup and decimated the entire flock! This is what angers us! We’re OK with the local wedge tailed eagle pair that occasionally take a chook, they only ever take one and we’ll admit look majestic doing it. We’re OK with the occasional fruit bat nibbling at some of the apples, its usually only the top tree fruit they take. We’re even OK with occasionally having to loose a bed of tomatoes to fruit flies if it has been a particularly wet and humid year. Them’s the breaks. But when an animal like a fox gets access to chickens … nothing short of hell breaking loose is the best description of the aftermath.

We found 31 beautiful birds scattered and dead one morning. It was heart breaking. All those friendly chooks and roosters senselessly killed. Necks snapped and left intact for most too. We don’t like to write about the sad things that happen around here, but sometimes we need to remember them to ensure we learn from them. One thing is for certain, we have finally invested in a trap and we’re looking into getting a dog or two from the local animal shelter sooner rather than later.

We can definitely say that electrified chicken fences work wonders. Also having a wire skirt or mesh around a fence also stops foxes from digging, but NEVER let anyone tell you that a pen is fox proof at 1.8m (6 foot) because the little blighters can still climb over if they put their mind to it!!!

Rest in peace our little flock. We’re sorry that we couldn’t keep you safe.

Chicken masacre by foxes

(Not all animals are pictured as their carcasses were not in a condition we believed people would be comfortable viewing).

Busy building large scale chicken tractors

The last couple of weeks, we have been planning and building our next phase in on farm equipment … our Joel Salatin style Chicken Tractors!

We have owned chickens for many years and the eggs produced by home flocks are far superior to store bought ones. So our challenge has been to find a way to provide fresh pasture, insects and quality feed to a commercial number of chickens with a low carbon footprint and a superior predator protection. A pretty hefty list of requirements by any standard!

A few years ago, we fell in love with Joel Salatin and his farming methods. Since then, we have been visiting other farms nearby who have been trying to take the same problems as us. By far, most have adopted Joel’s methods too. So this month, our target was to build our first pastured poultry run … and so far, it’s a resounding success!

Based on Joel’s book, we created a series of panels that we joined together to make a pen. Let me describe it in photo’s for you.

After creating a rough drawing, we set to work measuring, cutting and painting the timber. We decided to paint it to involve the kids and also protect the timber from the elements.

Next, we created a series of frames and double covered them in wire mesh, leaving a long skirt hanging off the external frames as fox protection. In the past, the foxes here have managed to pull wire off to get to our birds and also dig under our fences, hence the skirt.

We used 1800 bird wire, doubled over and tacked every 15cm. If a fox is determined enough to get through that … then he can take all the birds he wants.

Next we connected all the frames together and built the doors. Because it is very hot here, we decided to provide a larger connected shade area for our chickens. This is why half the door is covered in ours rather than having one fully covered and the other just mesh as per Joel’s design.

The bird mesh provided great friction in keeping the doors in place. We then connected a rope and pipe as a handle at the front and used our trusty hardware trolley as the fulcrum at the back.

Here it is in situ, awaiting the new girls.

We peg the skirt down at the edges for extra security. We will keep you posted on how it works out!

Now just to build a few more for the meat birds!

Fertile Eggs and Incubation Preparation

Egg Fertility Basics

Most people don’t realise that you need fertile eggs to hatch a chick.

Eggs are laid by female chickens. You need a rooster (male chicken) with your hens to be able to hatch your own eggs. And to ensure you have a high fertility rate, it is best to have one rooster for every 3-8 hens. The best ratio I have found is having 2 roosters covering ten to twelve hens.

Diet is also important. You need to ensure that your flock has a well balanced diet and has plenty of water. Any stress to your chickens will result in poor quality eggs and low fertility rates. Regular layer pellets provide a good balanced diet. But chickens LOVE scraps and fresh leaves. So anything from your table that you don’t eat (this includes small cuts of meat too) are perfect for chickens. Any weeds you pull from your garden are also excellent supplements for your flock, especially all the slugs and snails!

Chickens do not lay eggs all year round. They have a “break” over the winter months and stop laying daily. When daylight hours start to lengthen (after June 22nd in the Southern Hemisphere), chickens begin to lay more eggs again. The last month of winter is considered by most to be the start of the breeding season for chickens. The eggs laid during the last month of Winter and through Spring are the best used for hatching.

Here is an image of some of our Plymouth Rock flock chowing down on some scattered feed and fresh leaves.

Checking Fertility

A fertile egg is one that has a sperm bundle with it. If you grow your own chickens and use their eggs, you will notice this as an extra yellowish bundle attached to the egg yolk when it is cracked open.

You cannot check for fertility immediately after laying. This is especially true for eggs that have a thick shell or dark colour. The best time to check for fertility is around 5 days after incubating starts. This is done using a technique called candling. Essentially, you shine a bright light through an egg to determine if the embryo has started to develop. A developing embryo is one where you can clearly identify blood vessels traversing through the egg white from the embryo (egg yolk). Any egg that is not fertile needs to be discarded. Nothing smells worse than a rotten egg exploding in an incubator. Blech!

Collecting eggs for incubation

Eggs that you collect for incubating need to be treated a little differently to those you use in the kitchen. Here is a list of pointers…

Do not wash your eggs
A chicken has only one “out hole” … for everything! (Yes, this means that every egg laid comes out of the same place where its’ excrement come from.) This is why eggs used in the kitchen need to be washed to ensure that pests and diseases are not transferred to us. But when you are collecting eggs for incubation, do not wash them. If the eggs are particularly dirty, you can scrape it off or quickly wash it under running water.
There is a thin membrane on the outside of every egg which protects the contents of an egg from pathogens. Washing your egg will break and/or remove this membrane, leading to a greater potential of infection to a developing chick.
Use your cleanest eggs
Egg shells are porous. It is through the small holes in the shell that a developing chick will breath. You get a better hatching rate from clean eggs than from dirty eggs as they are exposed to fewer potential pathogens.
Turn your eggs at least once per day (twice is better)
Store the eggs you collect in an egg carton and mark them with a pencil or thin marker (so no one will eat them!). At least once per day, rotate the egg carton. I find it easiest to remember doing this at breakfast and at dinner.
Rotating your eggs daily ensures that the egg yolk does not stick to the inside of the egg shell. This causes deformity as the chick developed if it occurs.
Use your freshest eggs (unto 7 days old is best. Up to 10 days old can still work)
The freshest eggs develop the best. This is because the embryo deteriorates over time. From 1-7 days, the embryo is at its optimum performance. Between days 7-10, the membrane around the yolk starts to break down. An egg will not start to develop until you start to incubate it.
When you collect your eggs, write the date on them. Just the day is fine (e.g. 22/09/2014 only needs “22” written on it). That way, you will always know how fresh your eggs are.
Keep them at room temperature
To ensure that an embryo does not die before you start to incubate it, keep it at room temperature. You can refrigerate them, but as most fridges internal temperatures vary and a lot of modern fridges are “frost free”, it will kill the embryo before incubation. An egg shell is porous, so fluid will slowly evaporate through the shell quicker in a “frost free” fridge than at room temperature.


Check out our other post about incubation for more info on hatching your own chicks.